A relationship between entities is a reference between documents that belong to different domains. This reference is defined by a field in each entity. This field should be completed with the ID of the related entity's document and will not be visible to the user.
For example, assume your store has a Customer entity and a Wishlist entity. If you want each customer to be able to create multiple wishlists, you must create a field in the Wishlist entity to link each one of them to a customer.
Master Data has a few predefined relationships by default, such as Customer (CL) and Address (AD).
Creating a relationship between data entities
To create a relationship, there must be two data entities. If there is only one entity, you may create another following the instructions below. To learn more about data entities, see Data entities.
In the example above, you need to create a data entity called Wishlist which will have a relationship with the Customer entity. This relationship will allow a customer to have multiple wishlists, but a wish list can only belong to one customer.
Check out the instructions below for the aforementioned example.
-
In the VTEX Admin, access Store Settings > Storefront > Master Data.
-
Click
Advanced settings. -
Click Data structure. You will be redirected to a new page.
-
Click the Data Entities tab.
-
If you want to create a relationship in a new entity, click the
Addbutton to create a new data entity.If you want to create a relationship in an existing entity, find it and click the edit button , then go to step 7.
-
Configure the entity that will be created by completing the Acronym and Name fields and adding the desired fields. Learn more about fields in Creating a field in Master Data.
In this example, the entity will use the name
Wishlist, the acronymWL, and the fieldwishlistof typeVarchar 750.For more details on how to complete these fields, see Data entity.
-
Add a field of type Relationship and define its name. In this example, it will be called
Customer. -
Click the gear icon next to the Relationship field to configure it.
-
Under Custom field type settings, select the entity you want to link and the field that will be displayed in the relationship. In this example, the relationship will be with the Customer entity, and the email field will be displayed.

-
Click the
Savebutton to save the settings. -
Click the publish icon to publish the entity.
-
You may also need to update the applications to implement the changes. To do this, go to Store Settings > Storefront > Master Data and click the
Reload Applicationsbutton.
Creating a relationship between documents
You can also create a relationship between documents once there is a relationship between data entities. To do this, you will need to edit the form of a data entity.
Follow the steps below:
- In the VTEX Admin, access Store Settings > Storefront > Master Data.
- Click the gear icon next to the application name.
You will be redirected to the list of forms in that application.
-
To create a new form, click
+ New. -
Enter the Name of the form.
-
Select the Data entity to which the form will be linked. In this tutorial, we will use the Wishlist entity as an example.
The entity's fields will be displayed in a list on the List Fields tab and can be selected to compose the form.
-
Select the relationship field and any others you want to include in the form. In this example, we will include the Customer field (relationship) and the Document ID and Wishlist fields.
-
Click the Layout Schemas tab to configure the form layout.
-
Click
Add New Sectionto create a section on the form. -
Name the section.
-
Drag the relationship field (in this case, Customer) into the section and the other fields you want to include in the form.
-
Click
Save. You will be directed to the list of forms in the application, which includes the new form. -
In the new form's row, click the edit icon .
-
Click the Layout Schemas tab.
-
Next to the relationship field (in the example, Customer) click the edit icon .
-
Select the Combo box option and click
OK. This option allows you to select existing field values stored in the related entity when completing the form. -
Click
Save. -
Click the Applications tab.
-
Click the
Reload Applicationsbutton.
Now, when you create a new document from the form, you can select the desired value (in this example, the pre-existing Customer who will be linked to the Wishlist).
You can also view the related records by accessing each record of an entity. For example, you can view the Wishlist created by a Customer when accessing the customer's record.
To do this, you need to add the value {relationship_entity_acronym}.{relationship_field_name} to the entity's form in the View queries field. Example: WL.customer.
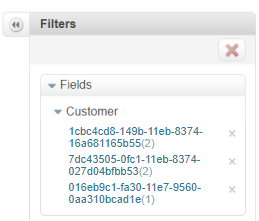
Adding filters to relationship fields
Relationships are kept through document IDs. Trying to insert the relationship's field value as a filter in the form will return only the IDs of the referred documents, and not each document's value for the chosen field. The image below shows this result. For more information, see How to filter data in Master Data.