After installing the app, you must configure it in the VTEX Admin. To do this, follow the steps in the next sections of this article.
- Completing the integration configuration form.
- Connecting your TikTok account.
- Configuring TikTok for Business.
1. Completing the integration configuration form
First, you must fill in the TikTok integration configuration form with the requested information.
- In the VTEX Admin, go to Marketplace > TikTok. For some versions of the VTEX Admin, you can access the page in Apps > My apps > TikTok.
- Complete the form with the information described in the following sections:
- Click
Continue. - Check the information displayed before proceeding.
- Click
Confirm. You will be directed to a screen to connect to the TikTok account.
Configuration of the catalog integration
In this part of the form, you need to fill in information that will be used to integrate your product catalog with TikTok.
-
Affiliate ID: the identifier of the new affiliate you want to create for the integration. The affiliate ID must contain only 3 consonants and cannot be associated with an existing affiliate. We suggest using
TKTto easily identify TikTok. It is important to check if the ID is not in use in Orders management > Settings > Affiliates. The affiliate will be created automatically when you complete the configuration. -
Trade policy: a field to select the trade policy to be associated with a catalog integrated with TikTok. Currently, the integration only accepts trade policies with BRL as currency. See the Sending product data to TikTok section for more information.
Do not change the affiliate configuration created automatically through this integration. Any future manual changes to the affiliate's configuration in Orders management > Settings > Affiliates may cause the integration to stop working.
Company data
In this section, you must enter your store’s information, which will be sent to TikTok.
- Store name: the name of your store as it will appear on TikTok.
- Store website: URL of your store's website that will appear on TikTok. It cannot be changed later.
- Segment: a field to select the market segment in which the store operates, among the options made available by TikTok.
- Country: the country in which the store operates. Currently, the integration is only available for Latin American countries.
- Time zone: the time zone in which the business is located.
Contact information
Here, you need to specify the contact details of the person responsible for the integration, so that TikTok can contact them if necessary.
- Email: the email of the person responsible for the integration. It does not have to be the email address of your VTEX Admin account, you can inform any contact email address.
- Country code: the country code for the phone number of the person responsible.
- Phone: the phone number of the person responsible.
2. Connecting the TikTok account
After completing the integration configuration form, you need to connect your TikTok account. To do this, please follow the instructions below:
-
Go to Marketplace > TikTok (or Apps > My apps > TikTok, in some versions of the VTEX Admin) and click on
Connect Account. This will open a TikTok window to log in to your TikTok for Business account. -
Log in using the email and password provided for your TikTok account. You will be redirected to the Set up TikTok for Business page in the TikTok environment.
3. Configuring TikTok for Business
We recommend disabling the extensions that block ads in your browser to avoid errors in the following steps.
On the Set Up TikTok for Business page, as illustrated below, please follow the configuration instructions described next.
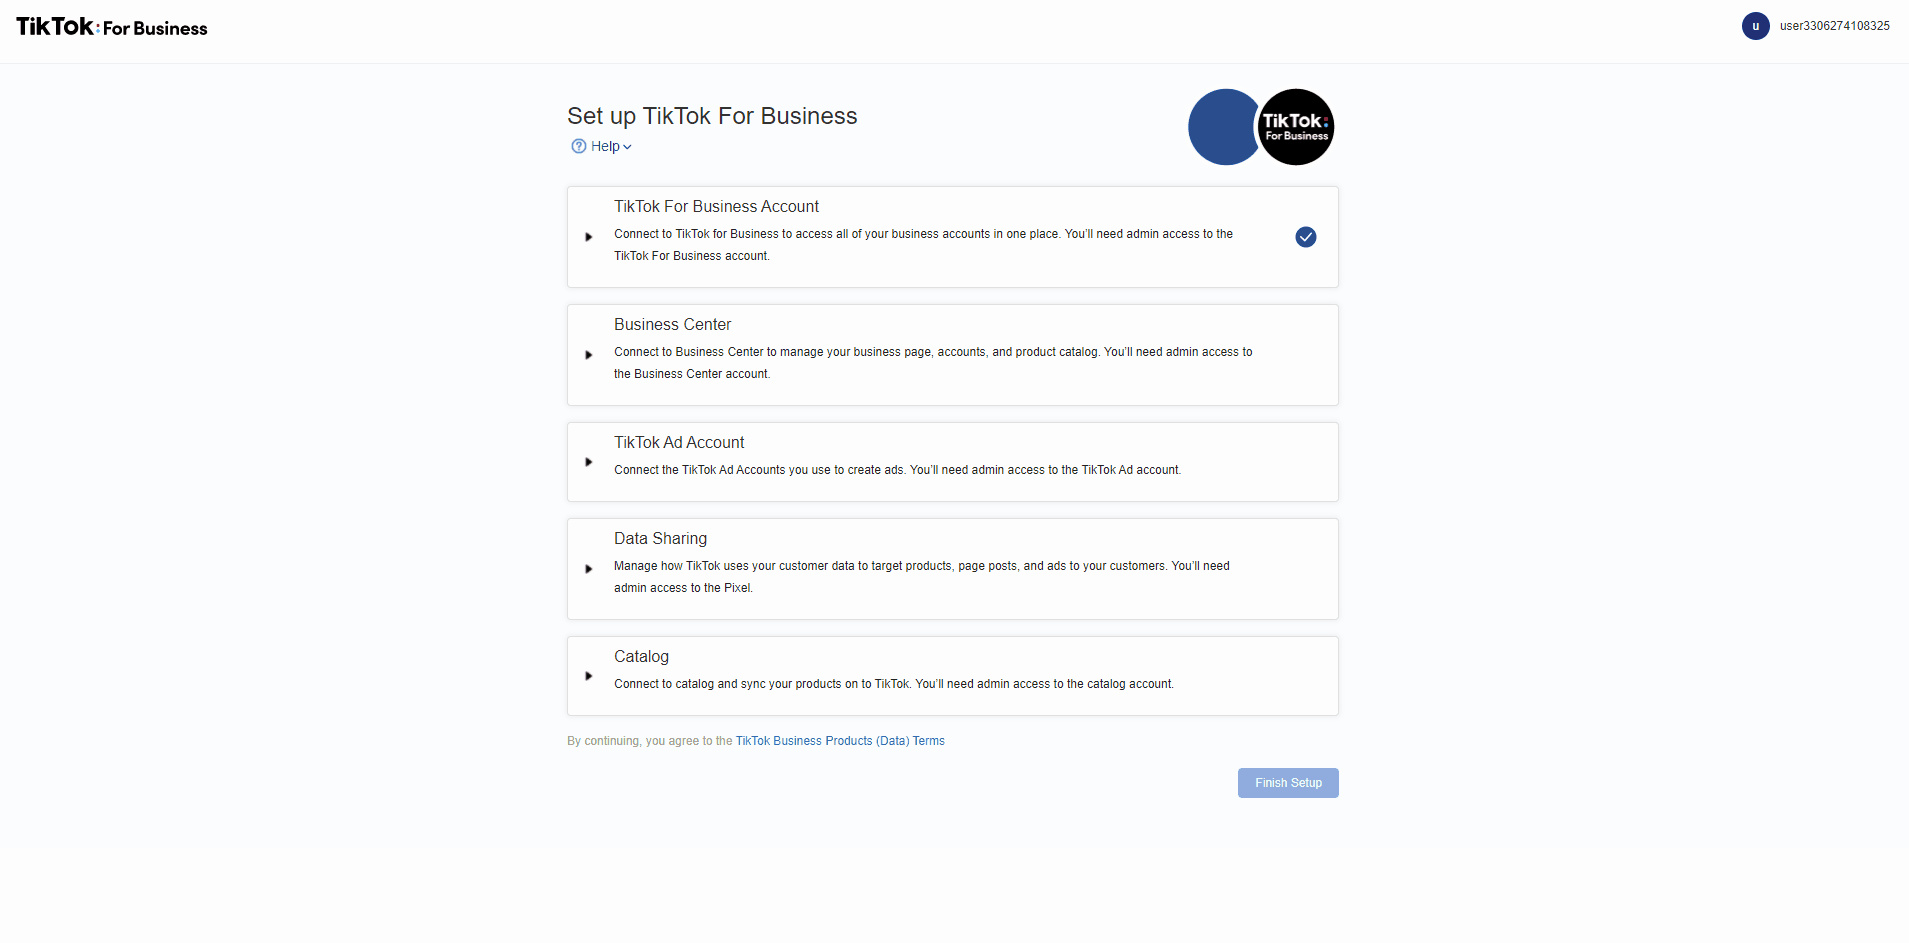
- Click the TikTok for Business Account section and check if your account is listed.
- If you want to connect another account, click
Disconnectand repeat the login step described in Connecting the TikTok account.
- If you want to connect another account, click
- Click on the Business Center section to connect to a Business Center account.
- In the Business Center section, choose one of the following options:
- To connect to an existing Business Center, click
Connect. - To create a new Business Center: Edit the name of the new Business Center as desired and click
Create New.
- To connect to an existing Business Center, click
- Click on the TikTok Ad Account section to connect to your TikTok Ads Manager account, i.e. the account you use to create ads on TikTok.
- In the TikTok Ad Account section, choose one of the following options:
- To connect to an existing Ad Account, click
Connect. - To create a new Ad Account: Edit the name of the new account as desired and click
Create New.
- To connect to an existing Ad Account, click
- Click on the Data Sharing section to create a TikTok Pixel.
- In the Data Sharing section, edit the name of the new Pixel as desired and click
Create New. - Use the button to enable or disable Advanced Matching. This feature is not available for the VTEX integration at the moment, so even if you enable it via this button, it will not be applied.
- Click on the Catalog section to integrate your catalog with TikTok. Read Sending product data to TikTok for more information on this process.
- In the Catalog section, edit the name of the new catalog to be created in the TikTok Catalog Manager as desired and click
Create New. The products associated with the trade policy informed in the form will be added to this catalog onc TikTok. - Click
Finish Setup.
When you complete this setting, you will be redirected back to Marketplace > TikTok in the VTEX Admin, where you can manage the integration. For some versions of the VTEX Admin, you can access the page in Apps > My apps > TikTok. After the configuration has been successfully completed, any user logged into the VTEX Admin can access the TikTok management area.
Sending product data to TikTok
TikTok only syncs products that comply with the platform's advertising policies. Read TikTok Advertising Policies for more information.
Once the integration is configured, sending products to TikTok will be an automatic process. The following data will be submitted:
- Product name
- SKU ID
- Product ID
- Category
- Description
- Brand
- URL
- Condition
- Availability
- Price (in BRL)
- Images
For products to be synced, all of the above information must be completed. Updates to product listings made in the VTEX environment, via API or Admin, are automatically replicated on TikTok.