This tutorial is for stores using Legacy CMS Portal. For other stores, the configuration is made in Pages. Please refer to Managing URL redirects for more information.
URL mapping is used to redirect specific URLs to other URLs. This feature is useful when a store already has URLs indexed in search engines and wants to redirect them to more attractive ones without changing the SEO and avoiding indexing errors.
All mapping activities recorded will be executed according to 301 redirects. The 301 redirect, also known as “permanent redirect,” transfers all key data from the original URL (Page Rank, Link Popularity, etc.) to the new URL.
There are two ways to add and change URL mapping:
Manually
-
In the VTEX Admin, access Storefront > Layout
-
Click on the CMS folder to open the directory.
-
Click on the URL Builder folder.
-
Click on the
Addbutton to add a new mapping or theUpdatebutton to edit an existing one. -
Fill in the URL Builder fields.
-
Save by clicking on
Save URL.
URL Builder fields
- Url from: URL that will be redirected. This URL must not contain the domain. Required field.
- Url to: URL to which the navigation will be redirected. This URL must not contain the domain. Required field.
- Start date: date and time when the mapping will start to be considered. Required field.
- Start date: date and time when the mapping will no longer be considered.
- Active: indicates if the mapping option is active or inactive.
To map a URL to home (root directory), fill in the Url to field with a slash
/.
Via spreadsheet
- In the VTEX Admin, access Storefront > Layout
- Click on the CMS folder to open the directory.
- Click on the URL Builder folder.
- Click on
Importto import the spreadsheet. - Download the spreadsheet template illustrated below by clicking on
Export.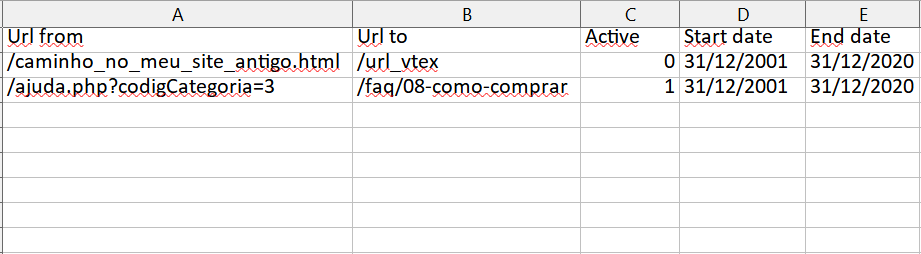
- Fill in the spreadsheet fields.
- After populating the spreadsheet template, click on the
Localizebutton on the import page to upload the template. - Select the file you want to upload. The filename extension must be
.xlsin the formatExcel 97-2003 Workbook. - Click on the
Save filebutton to finish. A message will be displayed informing the number of URLs added.
Spreadsheet fields
- Url from: URL that will be redirected. This URL must not contain the store’s domain. Example:
/path_on_my_old_website.html. - Url to: URL to which the navigation will be redirected. This URL must not contain the store’s domain. Example:
/path_on_my_old_website.html. - Active: indicates if the mapping option is active or inactive. Set
1to enable and0to disable. - Start date: date when the mapping will start to be considered. The date format must be
dd/mm/yyyy. - End date: date when the mapping will no longer be considered. The date format must be
dd/mm/yyyy.