Domain-related settings are necessary for a web address to be correctly routed to a VTEX store. This guide covers the following topics:
- Store address structure
- Rules for main hosts
- How to register a new host
- How to change the host from an active store
Store address structure
The store's address is composed of the following elements:
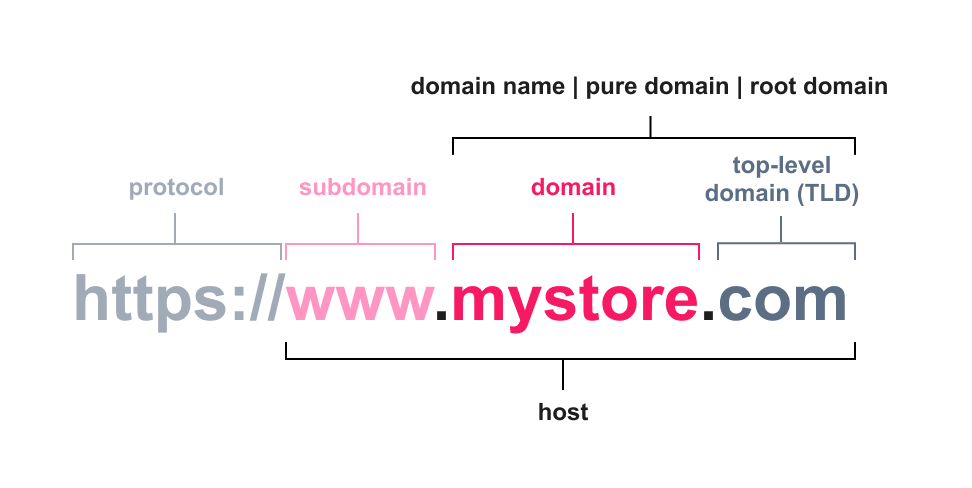
| Element | Description | Example |
|---|---|---|
| Protocol | Communication protocol used on the internet. | https:// |
| Subdomain | Prefix added to the domain name. | www |
| Domain | Exclusive name used to locate and identify your store on the internet. | mystore |
| Top Level Domain (TLD) | Suffix after the period of a domain name. | com |
| Domain name / Pure domain / Root domain | Domain + top level domain. | mystore.com |
| Host | Subdomain + domain + top level domain. | www.mystore.com |
Once you have defined your store's domain, you need to configure the main host in the VTEX Admin to communicate between the address and the store's content.
Rules for main hosts
Before proceeding with your store's address configuration, consider the following guidelines to ensure a successful implementation:
- CDN provider: VTEX uses Cloudfront as CDN provider in the stores. Your store's domain must not be registered with Cloudfront by the time you perform the pointing. Otherwise, there will be a failure in the CDN provisioning for your store and, consequently, at go-live. So, if you have the store domain registered on the Cloudfront platform, delete it before pointing the DNS to VTEX.
- Main address: The store must have a single main host, which will point to the VTEX servers. This host must contain a subdomain, which can be
wwwor others. - Additional addresses: Any additional addresses, whether with a different domain or a version without subdomains, must be redirected to the single main host, as described in the Redirects section.
Host examples
Check out the host examples below and see which ones can be used as the main host:
| Host example | Can be used as a host: yes (✔️) or not (❌) | Description |
|---|---|---|
www.mystore.com | ✔️ | Contains the www subdomain. |
mystore.com | ❌ | Does not contain a subdomain. To configure access via this address, you must set up a host with a subdomain such as www.mystore.com and then create a redirect. Read Best practices for accessing the store without www for more details. |
store.mybrand.com | ✔️ | Contains the store subdomain. |
www.store.mybrand.com | ✔️ | Contains two subdomains: www and store. |
Redirects
To ensure your store is accessible via different URLs, such as www.mystore.com and mystore.com, you should register a single main host and redirect the additional addresses to the main one. Learn more about redirects:
We recommend implementing a single host in your store.
Registering a new host
To register a new host, they must comply with the guidelines specified in the Rules for main hosts section. Follow the instructions below:
- In the top bar of the VTEX Admin, click your profile avatar, indicated by the initial letter of your email address.
- Click the Account settings button.
- Click Account.
- Click the Store tab.
- Click the actions button corresponding to the store where you want to register the host and click
Edit. - Enter the host in the Hosts field. For example:
www.mystore.com. - Click
Add. - Click
Save.
After completing these steps, you can configure DNS pointing to VTEX.
FastStore stores also need to configure an address with the
securesubdomain. Refer to the Configuring external DNS for a custom domain guide for more details.
If your operation has more than one VTEX account or sub-account, don't change hosts from one account to another. This will cause failures in many aspects of your store.
Changing host
The VTEX platform is designed to support host changes without adverse impacts. If you need to change your store's host, follow the steps described in Changing the store domain.