A multistore, also known as a subaccount or multidomain, is a second store managed within the same VTEX administration panel. This feature is generally used when the store has other brands with similar logistics and payment methods or needs another environment, such as for B2B sales.
In this guide, you will learn how to create, configure, and delete a multistore.
Creating a multistore
Creating a multistore is free of charge for merchants. However, if you need to request an additional trade policy, additional costs will apply.
To create a new store, follow the instructions in the section Creating a store in the guide Account management.
You need to specify the domain of your new store. Learn more in the guide Configuring the store domain.
Once the multistore has been created, set the layout for each store based on the frontend technology used. For more information, see Setting layouts for each store.
Setting layouts for each store
In a multidomain environment, you can set different layouts for each store, depending on the domain accessed.
- For Legacy CMS Portal stores, see Layout.
- For stores developed using Store Framework, see Managing page and template content.
Defining trade policies
Trade policies are required to differentiate products and/or prices in each store. To learn more, see How trade policies work and Creating a trade policy.
Configuring a website
To allow customers to access the new store, follow the instructions below to create a website by copying the folder structure of your main site. This process makes it easier to create the layout and create a new website.
Stores developed using Store Framework should also follow these instructions. Otherwise, the new store won't be available.
-
In the VTEX Admin, go to Storefront > Layout.
-
Click CMS > Sites and channels.
-
Click your main website.
-
Click
Copy Website. -
Click Sites and channels again in the side column.
-
Click the website you have created and change its name.
-
Click
Save Website. -
In the Links field, click
Add.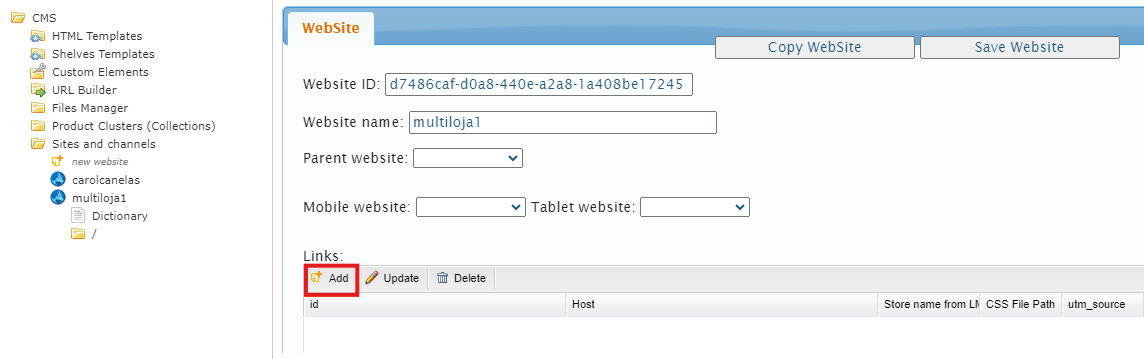
-
Complete the Store name from License Manager field with the value of the subaccount previously created in the [Account Management] module (#creating-a-store).
-
Complete the Available sales channel field by selecting the trade policies that will be associated with this store.
If your store uses more than one trade policy, check the sorting of these policies in Store Settings > Channels > Trade Policies. To learn more, see How the relationship between websites and sales policies works.
-
Click
Save Bindingand thenSave Website.
Configuring the XML domain
To automatically generate the XML file for the new store, follow the instructions in the guide Configure an XML domain.
Deleting a multistore
To delete an existing multistore, follow the instructions in the Deleting a store section of the guide Account management.
The name of the deleted subaccount cannot be used again.