The Sales Performance page is a dashboard for unified commerce that helps stores grow their business and make decisions more accurately. The dashboard allows users to analyze order data from their stores and sellers, in the case of stores that operate as marketplaces. On this page, users can:
- Monitor the health of their business
- Assess the impact of high-demand events, such as Black Friday and Cyber Monday, on their sales
- Understand the reasons for variations in sales volume or conversion rate
- Find opportunities to improve their store results
To access the page, go to Dashboards and click on Sales performance.
You can customize the view of chart and list data by filtering by period, dimensions and metrics.
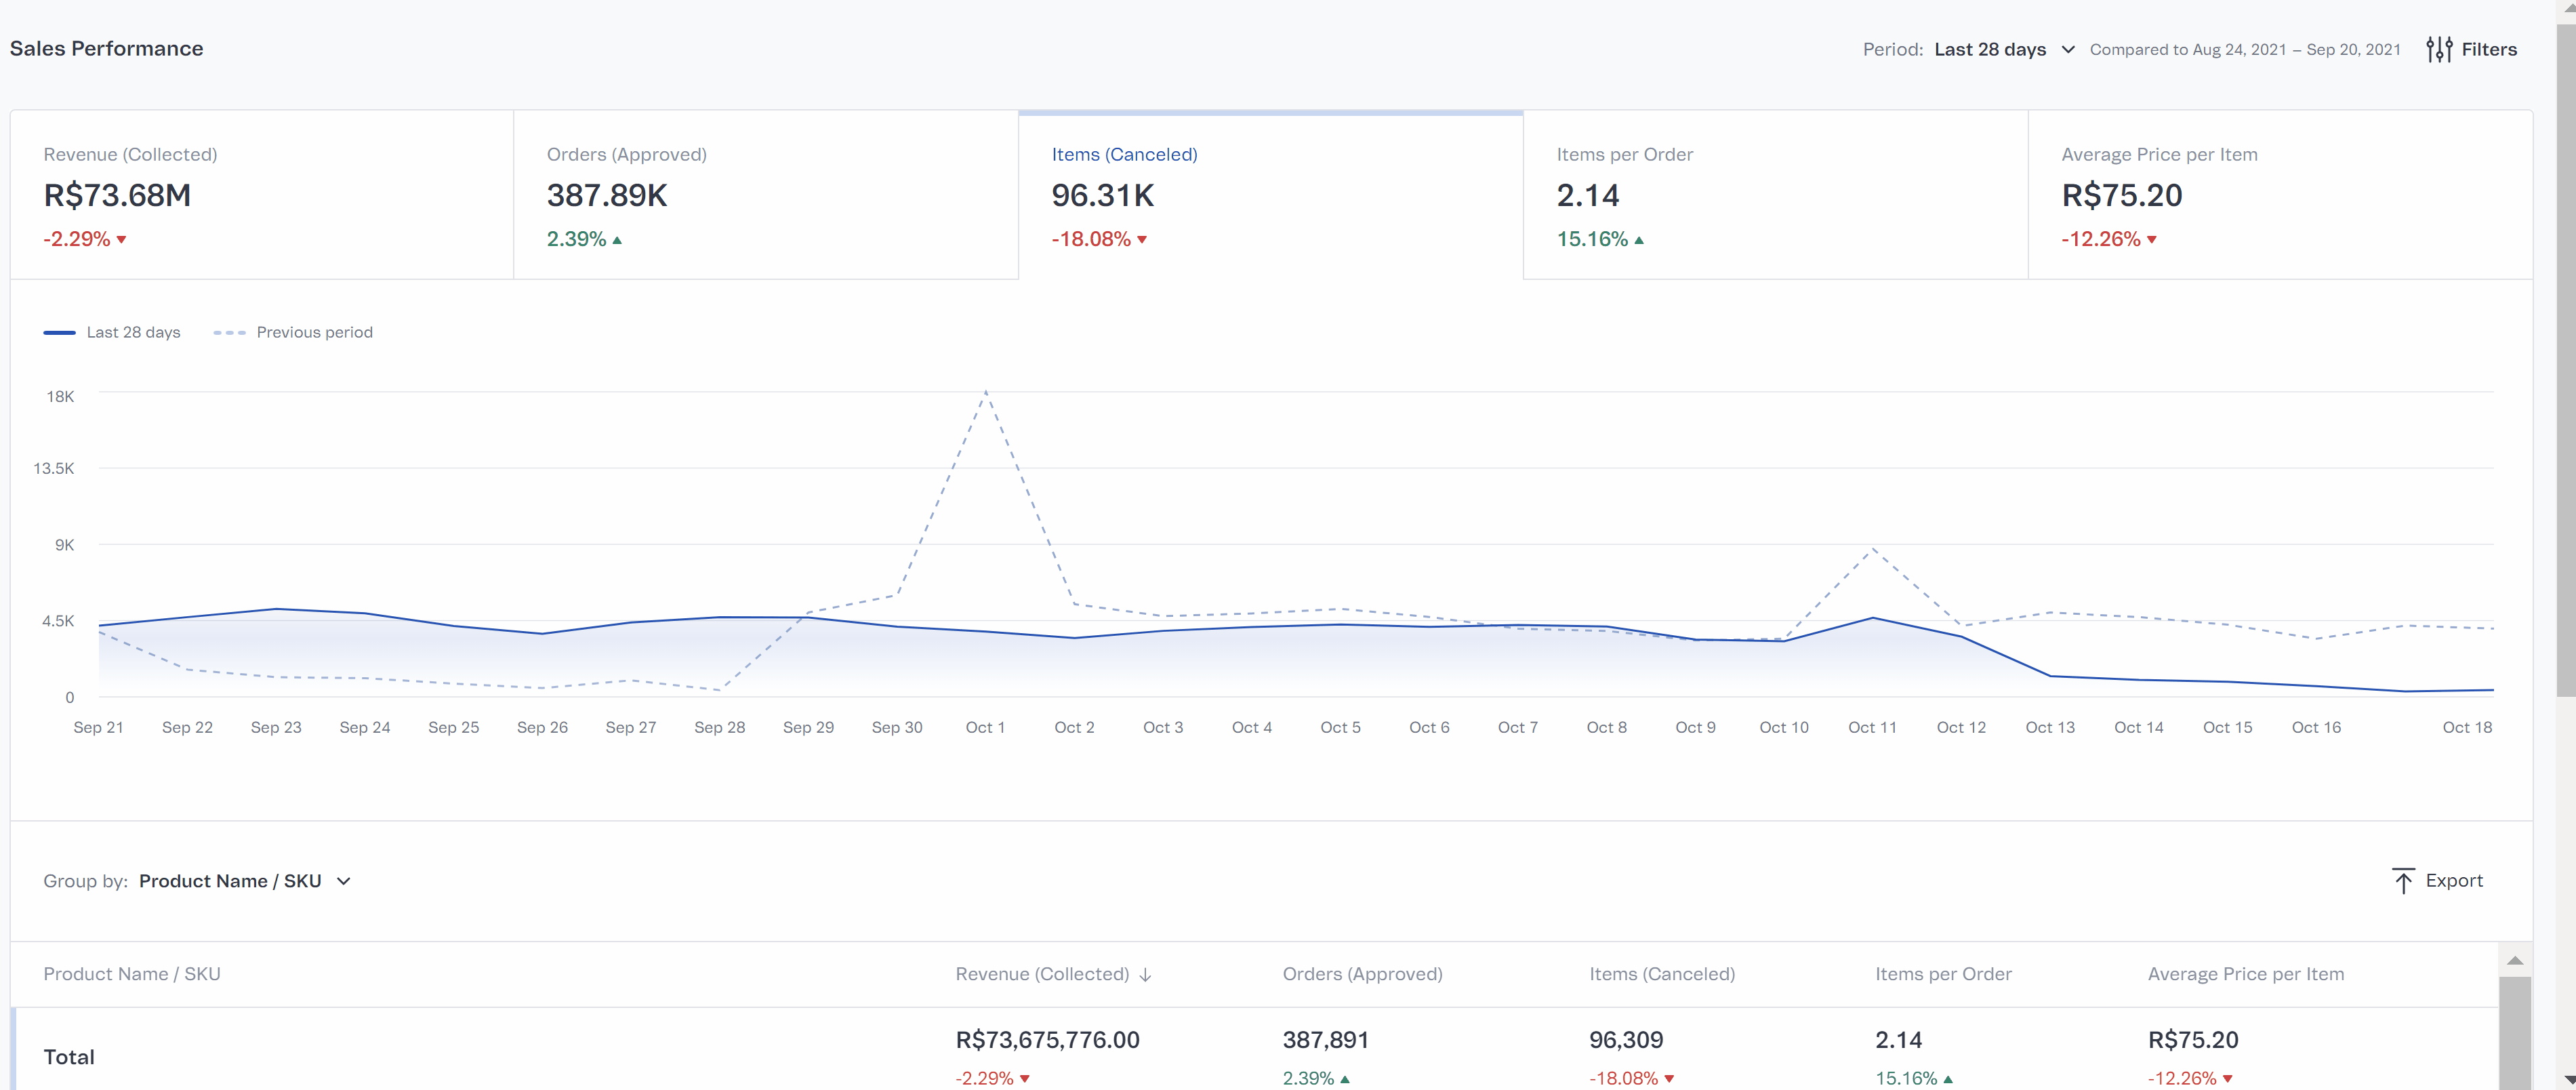
Data
The data on the page comes from the VTEX Order Management System. Sales Performance is an analytical solution, which calculates metrics using heuristics and formulas created based on our experience taking our ecommerce clients to the next level. The page must not be used as a substitute for the data from the OMS, but as a tool for analysis and business insights.
To ensure that you have access to the latest updated data as well as to all of your history for conducting analysis without affecting performance, internally, the Sales Performance dashboard divides this data in separate groups.
These groups are also processed by different systems, which may cause a difference between the data of the OMS and Sales Performance. Although, we do aim for a maximum of 5% divergence.
The revenue metric may differ from the average ticket metric recorded in the OMS and Sales Performance, for example. This is because Sales Performance considers an order's item values, while OMS also considers discounts, freight, fees, and promotions applied to the order, which may increase or decrease its final total.
Period
The period selector allows you to set the time interval to be considered for the sales performance analysis. Thus, you can understand how the metrics and dimensions developed compared to the previous period. The page's data is updated every hour, so users can expect a delay of 10 to 80 minutes, depending on the time they accessed the page. The filter can cover a maximum period of the last 90 days.
To change the period:
- At the top of the Sales Performance page, click the button next to Period.
- In Main period, select the desired start and end dates using the calendar.
You can also click the icon to make a quick selection from the options described in the table below.
- In Compare with, select the desired start and end dates using the calendar.
You can also click the icon to choose between the options described in the table below and Last period.
- Click
Apply.
The data on page will be filtered according to the selected period.
Check out the available period options below:
| Period | Start | End |
|---|---|---|
| Today | 00:00h of the current day. | Current time, with a delay of 10 to 80 minutes. |
| Yesterday | 12:00 a.m. on the day before the current day. | 11:59 p.m. on the day before the current day. |
| Last 7 days | 12:00 a.m. on the eighth day before the current day. | 11:59 p.m. on the day before the current day. |
| Last week | 12:00 a.m. on Monday of the week prior to the current week. | 11:59 p.m. on Sunday of the week prior to the current week. |
| Last 28 days | 12:00 a.m. of the 29th day before the current day. | 11:59 p.m. on the day before the current day. |
| Last month | 12:00 a.m. on the first day of the month before the current month. | 11:59 p.m. of the last day of the month before the current month. |
| Customized | Set the desired Start date in the calendar. | Set the desired End date in the calendar, occurring within the next 90 days after the start date. The duration between Start and End cannot exceed 90 days. |
Data from the period before the selected one is indicated by a dotted line in the chart. In this way, if you select the option Last 7 days, the dotted line on the chart will indicate the data for the last 7 to 14 days, for example.
Filter dimensions and data grouping
Dimensions are the options available for filtering, grouping, and comparing data in the Sales Performance dashboard. Learn more about the dimensions in the table below.
| Dimension | Description |
|---|---|
| Category | Categories registered in the architecture of your Catalog. |
| Brand | Brands registered in the architecture of your Catalog. |
| Marketplace out | Name of the marketplace where your store sells products. |
| Delivery method | Defines whether the order was shipped to the customer or delivered to the pickup point. |
| Shipping method | Name of the type of delivery, registered in the Shipping policy, that will be displayed for the customer at checkout (e.g. express, normal). |
| Destination city | Cities where your orders have been shipped to. |
| Destination state | States where your orders have been shipped to. |
| Seller name | Name of the sellers that sell products on your marketplace. You can check their names on the Seller management page. |
| Payment method | Methods in which your store's end customer can make payments, determined according to the Payment conditions. |
| Product/SKU name | Name of the products or SKUs you want to apply in the data view. |
| 1P / 3P | 1P, or first-party, determines the metrics of the store itself. 3P, or third party, determines the metrics of third parties. For example, by selecting the Orders metric and filtering by 3P, you'll see orders from third parties, i.e., your sellers, in the list and in the chart. |
| Campaign | Name of the campaigns created in the VTEX Admin. |
| Coupon | Name of the coupons created in the VTEX Admin. |
| Trade policy | Name of the trade policies in your store. The filter will apply each policy’s strategy and sales channels. |
| Promotions | Name of the promotions created in the VTEX Admin. |
| UTM Campaign | Name of the UTM Campaigns for your campaigns. |
| UTM Source | Name of the UTM Sources to track the traffic source on your ecommerce store. |
Metrics
Both the chart and the list display the metrics of your store based on data from the Order Management (OMS) module. The metrics are divided into:
Revenue
- Revenue (captured): the sum of the final amounts of the captured orders, which indicates the revenue the store received.
- Revenue (approved): the sum of the final amounts of the orders that had payments approved within the selected period.
- Revenue (invoiced): the sum of the final amounts of the orders that were invoiced within the selected period.
- Revenue (canceled): the sum of the final amounts of the orders that were canceled within the selected period.
Orders
- Orders (captured): the total number of captured orders within the selected period.
- Orders (approved): the total number of orders with approved payment within the selected period.
- Orders (invoiced): the total number of invoiced orders within the selected period.
- Orders (canceled): the total number of canceled orders within the selected period.
- Approved orders (%): the percentage of approved orders, calculated from the total number of orders with approved payment divided by the total number of orders captured within the selected period.
- Approved orders breakdown (%): the percentage of orders invoiced among those that had already been approved. It is calculated from the total number of orders invoiced divided by the total number of orders with approved payment within the selected period.
- Invoiced orders (%): the percentage of orders invoiced within the selected period. Calculated from the total number of orders invoiced divided by the total number of orders captured within the selected period.
- Packages per order: the average number of packages per order. This number can be lower than zero if some orders have no packages associated with them.
Items
- Items (captured): the total number of items that correspond to the orders captured within the selected period.
- Items (approved): the total number of items that correspond to the orders approved within the selected period.
- Items (invoiced): the total number of items that correspond to the orders invoiced within the selected period.
- Items (canceled): the total number of items that correspond to the canceled orders within the selected period.
Other
- Average price per item: the average price paid per item by the store's end customer.
- Average shipping cost: the average shipping cost paid by the store's end customer.
- Average ticket (Captured): the average amount paid for orders captured within the selected period.
- Average ticket (Approved): the average amount paid for orders with payment approved within the selected period.
- Average ticket (Invoiced): the average amount paid for orders invoiced within the selected period.
- Average ticket (Canceled): the average amount that would be paid for orders canceled within the selected period.
Filters
Filters use the dimensions to select the data displayed in the list and the chart.
The filter selector allows you to apply more than one filter, without a limit to how many filters can be overlapped. When overlapping filters, it is possible that you reach a data set with no information. For example, if there are no sales from seller ABC, in the fashion category, in the South region, with payment method Y, no information will be displayed.
To apply filters to your store's view of sales data, follow the instructions below.
- Go to Dashboards and click on Sales performance.
- In the upper right corner of the page, click on
Filters. - Click
+ Add filter. - In the first selector menu, select the desired data dimension.
- From the drop-down list, select the desired value(s) for the chosen dimension.
- Click the
Applybutton.
The Seller name and Product/SKU name options require you to enter the desired value.
- If you wish to add more filters, click the
+button and repeat steps 4 through 6.
Other filter options
In addition to applying filters, you can also perform the actions below.
- To delete all filters, click on the
Clear filtersbutton. - By clicking on the
:button, you will see the following options:- Duplicate: allows you to use the basis of a filter to create others, without deleting or overwriting a filter you already created.
- Copy link: allows you to share the view with another person with access to your VTEX store account.
- Pin: allows you to pin the filter view to the page.
- By clicking on a dimension in the list, you automatically create a filter view for that dimension. Learn more in Use cases.
Views
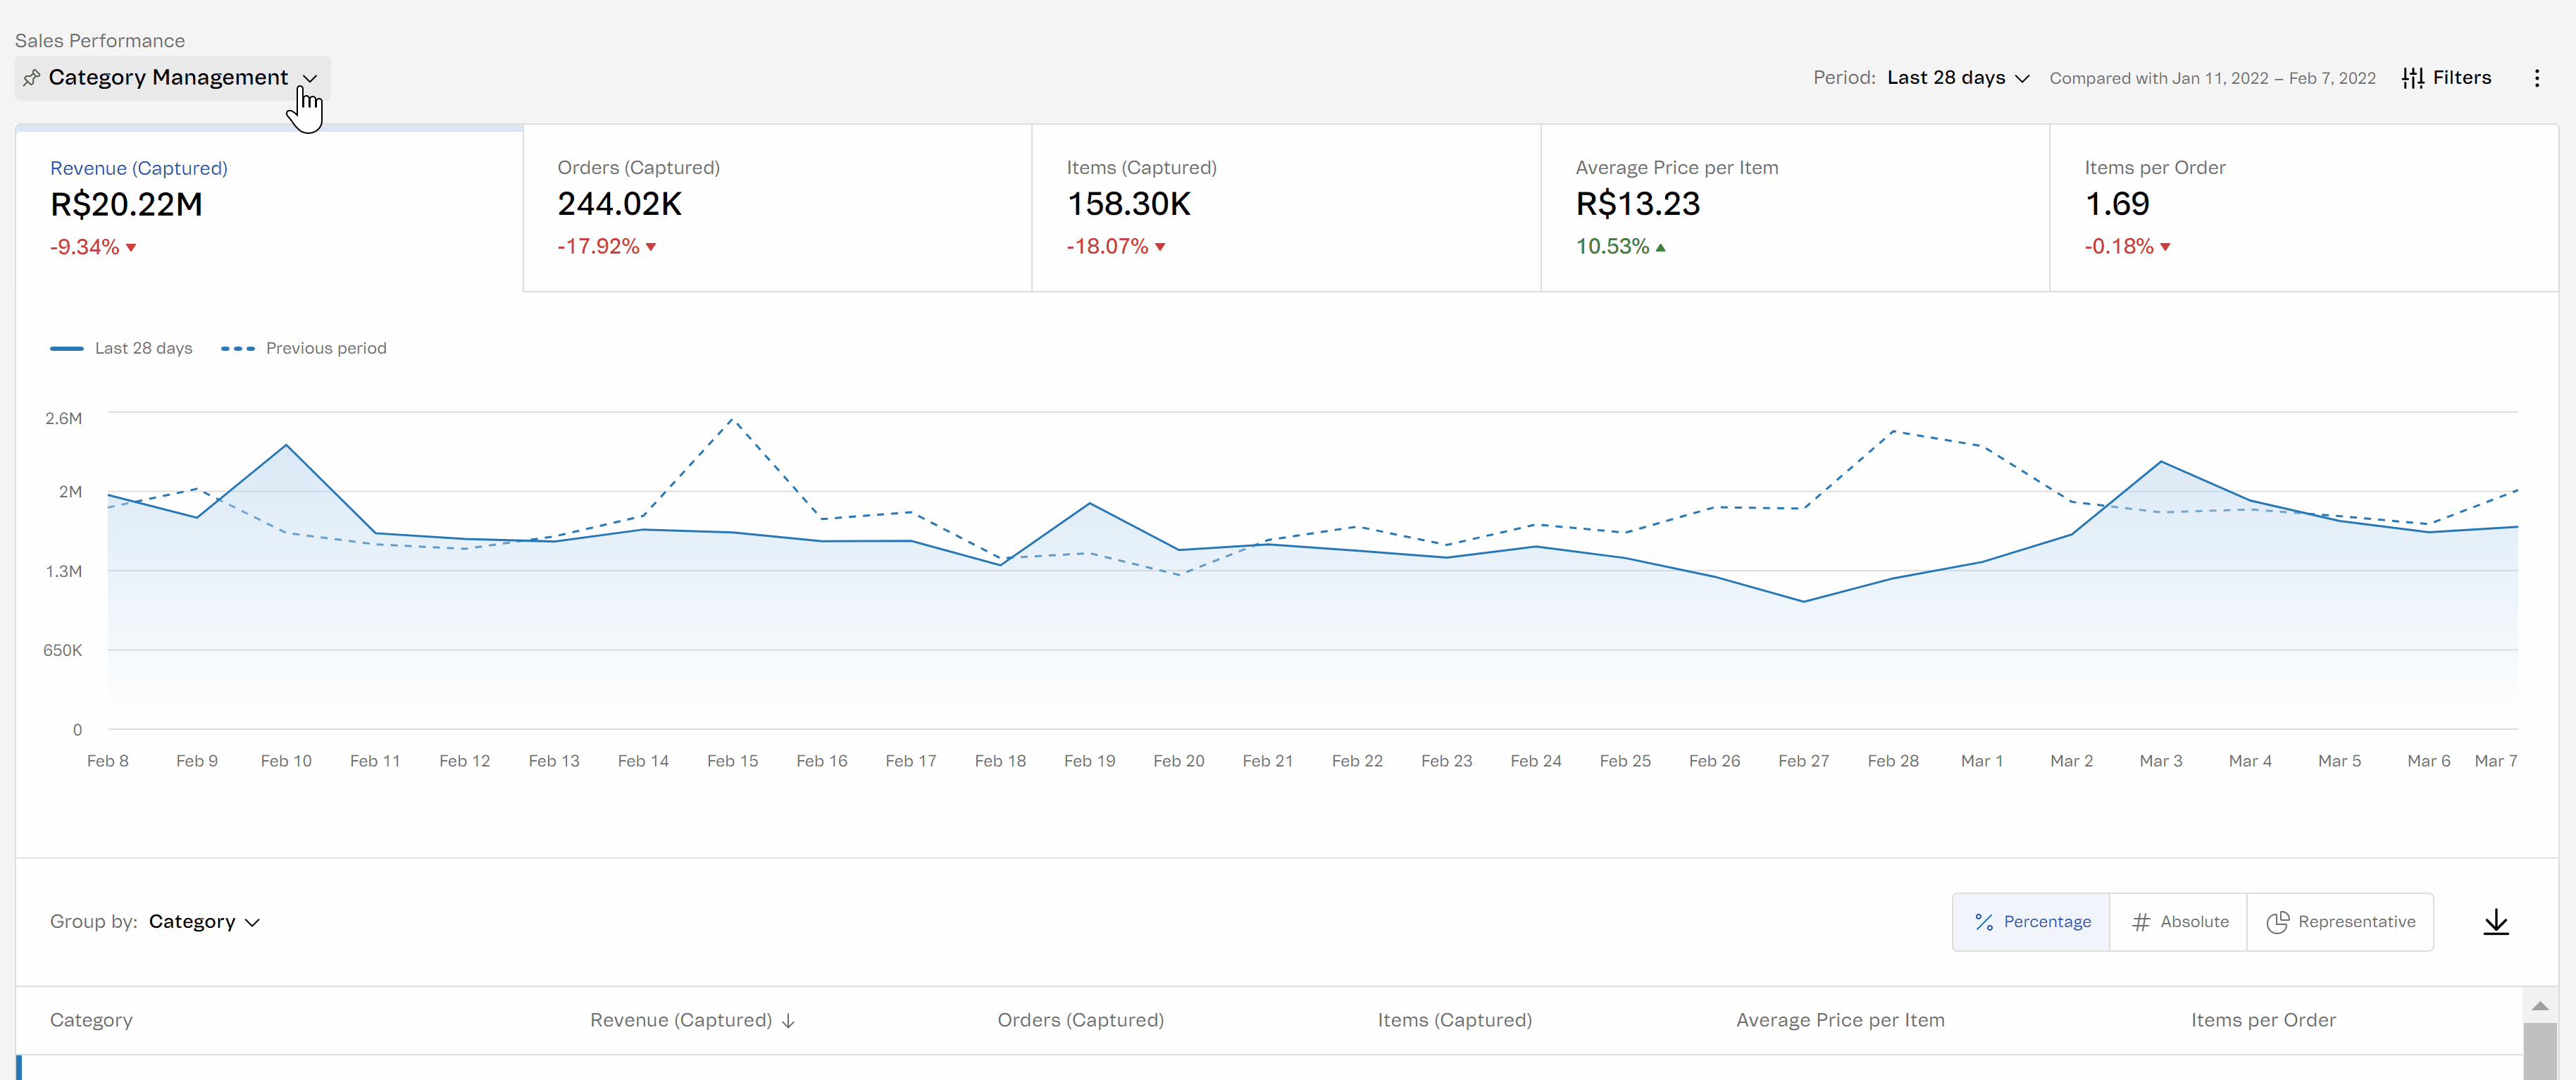
The Sales Performance dashboard can be customized by applying different filters and selecting the metrics that will be displayed in the chart and in the list. To facilitate your data exploration on a daily basis, we have created views, which save the filters and metrics applied on the page for your direct viewing. You can save, edit, and share different dashboard views. The page comes with the following views configured by default:
- Sales Management
- Fulfillment Management
- Category Management
- 3p Seller Management
To create a new view:
- Go to Dashboards and click on Sales performance.
- In the top left corner of the page, click on the icon.
- In Views, click the
+button. - Enter a name for the view.
- Click Create.
To edit a new view:
- Go to Dashboards and click on Sales performance.
- In the top left corner of the page, click on the icon.
- In Views, select the desired view.
- Make the desired changes to the page's filters and metrics.
- You can use keyboard shortcuts to save the changes.
- MacOS users:
command + S. - Windows users:
ctrl + S.
Other actions for Views
The views you create will be available under Views > Your views. Once you create the views, you can perform the following actions:
- Search for them by name or browse the options listed.
- By clicking on the
:button next to the name of the view, you can: - Pin: allows you to select the view that will always be displayed when you access the Sales Performance dashboard.
- Duplicate: allows you to use the basis of a view to create others, without deleting or overwriting a view you already created.
- Copy link: allows you to share the view with another person with access to your VTEX store account.
- Rename: allows you to change the name given to the selected view.
Chart
The chart on the page uses data from the VTEX OMS to illustrate the selected metrics for that period. The X axis represents the time, and the Y axis represents the selected metric. The dotted line represents the previous period, and the solid line represents the selected period.
Whenever you apply a filter, change the period, or modify a metric, the chart will update accordingly. By hovering your cursor over the chart, you can get more details about a specific metric within the selected period, including its percentage increase or decrease and a comparison with the previous period.
The page includes five tabs for charts of the selected metrics, so you can compare different data by navigating between tabs. By clicking on a tab, you only see the chart for that metric. The charts do not cross-reference data from different metrics. You can select the metric you want to view by clicking on the Change metric button.
List
The list represents the metrics and filters applied to the chart in table format. The columns represent the metrics selected on each tab of the chart, and the rows represent the dimension used to group the data.
- Change metrics and dimensions: to change the dimension used in the rows, click on the selector button next to
Group by:at the top of the page. To change the column metrics, click onChange metricon the corresponding tab of the chart. - Sort data: by clicking on the arrows next to the metric in each column, you can sort the data in the table in ascending (↑) or descending (↓) order. By clicking on a dimension in a row, you automatically create a filter view for that dimension. The previously applied filter stays in place, even if you change the grouping. To remove filters applied in this way, click on the filter selector at the top of the chart > Clear filters > Apply.
- Change data view: change the data view by choosing between the options:
- Percentage: view the percentage increase or decrease in each metric in the list, between one period and another.
- Absolute: view in absolute numbers the increase or decrease of the metrics between one period and another.
- Representative: view the percentage of representativeness of an item within a metric.
Note that the metrics Average ticket and Items per order do not have Percent or Representative views available, as these metrics are calculated by dividing others, and the sum of all the parts of each of them does not equal the Total.
Exporting data
You can export a file with the data from the list, following the dimensions and applied filters but including all metrics, not only those represented in the list's columns.
You will receive the file by email within ten minutes by clicking Export. The exported file comes in .rar format. To view it in spreadsheet format, you need to change the file type to .csv. To do so, open the file on your computer, and rename it by adding .csv at the end of the file name.
You can open the CSV file using many table readers, such as Google Sheets, Excel, and Numbers. If you open the file with unconfigured formatting in Excel, you can use Microsoft's Text Import Wizard to define columns better.
Use cases
There are several ways to use the Sales Performance page to extract business intelligence from the data. Below, we demonstrate ways in which you can freely explore data, investigate a specific piece of data, or analyze seller data by using the Sales Performance dashboard.
Exploring data
The page can be used in an exploratory way, which means you can switch between the chart and list view to identify unusual points or unexpected growth in some metric, for example. To do this, we suggest that you:
- View the chart, alternating between the different metrics.
- View the list by alternating between different dimension groupings.
- When you find a result that you would like to explore further, apply a filter.
- Save the view to repeat this analysis whenever you want.
Investigating specific data
Let's suppose you need some data from your sales to complete a report, or to prepare a presentation. The page can also be used to find a specific piece of data that you already have in mind. To do this, we suggest that you:
- Determine the desired period.
- Apply one or more filters with the desired dimension groupings by clicking on the selector button, or by clicking directly on the row in the list.
- Export the template with the grouped data to continue your investigation.
Seller data analysis
Let's suppose, for example, that you created a promotion for the Books category on your marketplace, and you want to investigate your sellers' performance in this scenario.
- To do this, start by selecting the period that corresponds to the duration of the promotion.
- Then, select dimension 3P in the filter selector and add another filter with the Books category.
- In the list, check the seller that has sold the most based on the Orders (Invoiced) or Revenue (Invoiced) metrics.
- Export the template with this data to analyze all your sellers’ sales metrics in the Books category.